Attic insulation upgrades in Southern Ohio and Northern Kentucky deliver some of the highest returns on investment of any home improvement you can make. Homeowners planning comprehensive remodeling projects and living in Ashland, Marietta, Steubenville, Athens, Gallipolis, Mt. Orab, Maysville, Paducah, Owensboro, Henderson, Portsmouth, Chillicothe, or Waverly, inadequate attic insulation is likely costing you hundreds of dollars annually in wasted energy while compromising your home’s comfort.
Most homes throughout our region built before 1990 have far less attic insulation than current standards recommend. Original construction typically included minimal insulation—often R-19 or less—that has compressed and deteriorated over decades. Modern recommendations call for R-38 to R-60 depending on your heating system, meaning many older homes need 6-12 inches of additional insulation to achieve optimal performance.
This comprehensive guide explains why attic insulation matters so much in our climate, what R-values mean and which your home needs, how air sealing multiplies insulation benefits, what upgrades cost, and how to find contractors who deliver professional results that actually lower your energy bills throughout Southern Ohio and Northern Kentucky.
Why Attic Insulation Matters in Our Region
Heat Loss and Gain Through Attics
Physics dictates that heat flows from warm areas to cool areas. In winter, heated air in your living spaces rises and escapes through inadequately insulated attics. In summer, superheated attic air (often reaching 140-160°F on sunny days) radiates through insufficient insulation into your living spaces below.
Attics represent the largest single source of heat loss and gain in most homes. While walls, windows, and floors also transfer heat, attics have the greatest impact because:
Large Surface Area: Attic floors cover your home’s entire footprint. Every square foot of inadequate insulation wastes energy.
Direct Exposure: Attics experience extreme temperature swings. Winter temperatures match outdoor conditions. Summer attics become superheated ovens. These extremes create massive temperature differences driving heat transfer.
Stack Effect: Warm air naturally rises in homes, creating pressure that pushes heated air into attics through any available opening. This natural buoyancy works against you constantly in heating seasons.
Energy Cost Impact
The Department of Energy estimates that adequate attic insulation can reduce heating and cooling costs by 10-50% depending on existing insulation levels and climate. For homeowners throughout our region spending $1,800-2,500 annually on heating and cooling, proper attic insulation saves $180-1,250 per year.
These savings accumulate. Over a 20-year period, inadequate attic insulation costs $3,600-25,000 in wasted energy. The one-time expense of adding insulation—typically $1,500-3,500 for most homes—pays for itself through energy savings within 2-7 years.
Comfort Improvements Beyond Energy Savings
Adequate attic insulation delivers comfort benefits that matter as much as financial savings:
More Consistent Temperatures: Rooms stay warmer in winter and cooler in summer. Second floors in two-story homes no longer overheat during summer months.
Reduced HVAC Runtime: Heating and cooling systems run less frequently, reducing wear and extending equipment life while lowering maintenance costs.
Eliminated Ice Dams: Proper insulation and air sealing prevent the heat loss that melts snow on roofs, creating ice dams that damage gutters and cause roof leaks common throughout our region.
Better Indoor Air Quality: Air sealing that accompanies insulation upgrades reduces infiltration of outdoor pollutants, allergens, and humidity.
Understanding R-Values and Insulation Types
What R-Value Means
R-value measures insulation’s resistance to heat flow. Higher R-values indicate better insulating performance. Each point of R-value represents specific thermal resistance—R-30 insulation resists heat flow twice as effectively as R-15 insulation.
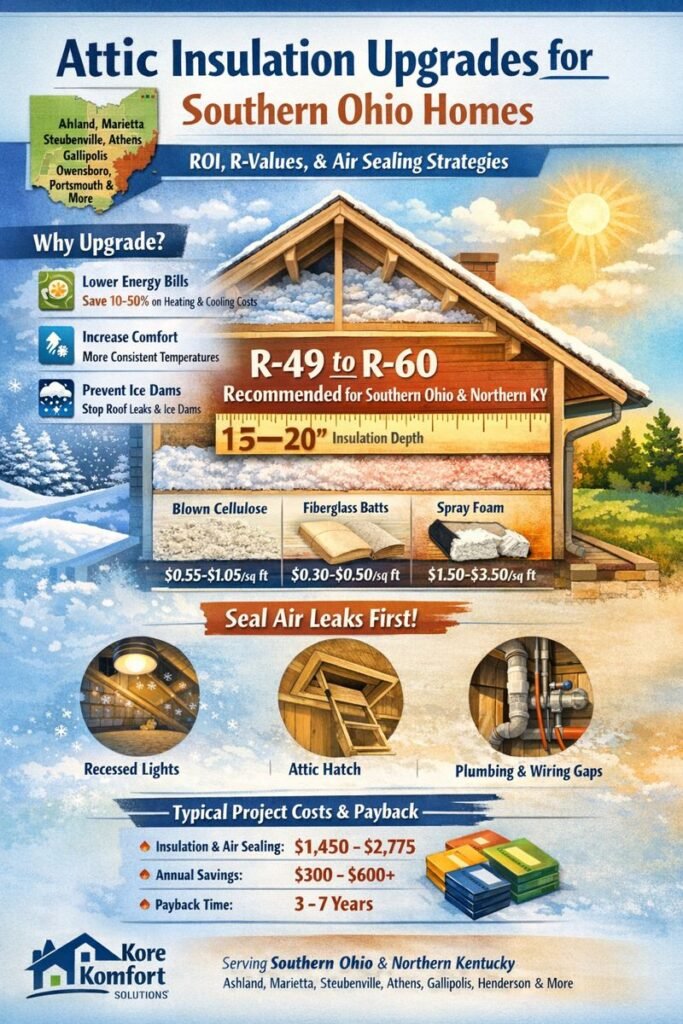
Climate zones determine recommended R-values. Southern Ohio and Northern Kentucky fall primarily in Climate Zone 4 and portions of Zone 5, requiring:
Attic Insulation: R-38 to R-60 depending on heating fuel Wall Insulation: R-13 to R-21 Floor Insulation: R-25 to R-30
Most older homes throughout Portsmouth, Chillicothe, Steubenville, and surrounding communities have R-19 or less in attics—less than half what current standards recommend.
Common Insulation Types for Attics
Fiberglass Batts: Pre-cut sections of fiberglass insulation faced with paper or foil vapor barriers. Easy for DIY installation but difficult to fit properly around obstacles. Gaps and compression reduce effectiveness dramatically. Cost: $0.30-0.50 per square foot.
Blown Fiberglass: Loose fiberglass fibers blown through hoses, conforming to irregular spaces and covering obstructions effectively. Professional installation recommended. Settles slightly over time. Cost: $0.50-1.00 per square foot installed.
Blown Cellulose: Recycled paper treated with fire retardants and insect deterrents. Denser than fiberglass, resisting air movement better. Settles more than fiberglass, requiring initial over-application. Excellent for our climate. Cost: $0.50-1.00 per square foot installed.
Spray Foam: Polyurethane foam sprayed onto attic floor decking or roof rafters. Provides insulation and air sealing in one application. Most expensive option but delivers superior performance. Two types exist: open-cell (R-3.5 per inch) and closed-cell (R-6.5 per inch). Cost: $1.50-3.50 per square foot installed.
Calculating Required Insulation Depth
Each insulation type provides different R-value per inch of thickness:
Fiberglass Batts/Blown: R-2.2 to R-2.9 per inch Cellulose: R-3.2 to R-3.8 per inch
Spray Foam (open-cell): R-3.5 per inch Spray Foam (closed-cell): R-6.5 per inch
Achieving R-49 (common recommendation for our region) requires:
- 17-22 inches of fiberglass
- 13-15 inches of cellulose
- 14 inches of open-cell spray foam
- 7.5 inches of closed-cell spray foam
Homes with existing R-19 insulation need additional R-30, requiring:
- 10-14 inches of blown fiberglass or cellulose
- 9 inches of open-cell spray foam
- 4.5 inches of closed-cell spray foam
Air Sealing: The Critical First Step
Why Air Sealing Comes Before Insulation
Adding insulation over air leaks is like wearing a winter coat with the zipper open. Air moving through gaps carries far more heat than conduction through solid materials. One square inch of gap allows as much heat loss as several square feet of uninsulated surface.
Professional insulation contractors throughout Ashland, Marietta, and Athens always seal air leaks before adding insulation. This sequencing maximizes insulation effectiveness and prevents moisture problems that occur when warm, humid air reaches cold surfaces in attics. If you are planning a major remodeling project pay particular attention to scheduling the insulation.
Common Air Leakage Points
Recessed Lighting: Non-IC rated can lights create large openings where heated air escapes. Each fixture can leak as much air as a 2-inch diameter hole. Homes with dozens of recessed lights lose enormous amounts of conditioned air.
Attic Access Hatches: Poorly sealed hatches act like open windows. Weather-stripping and insulated covers dramatically reduce leakage.
Plumbing Penetrations: Pipes passing through attic floors rarely have gaps properly sealed. These openings allow air movement and provide pathways for pest entry.
Electrical Penetrations: Wiring passing through top plates, junction boxes, and light fixtures creates numerous small gaps that collectively leak substantial air.
HVAC Ductwork: Unsealed duct boots, disconnected duct sections, and gaps around register boots allow conditioned air to escape directly into attics—wasting the energy used to heat or cool that air.
Chimneys and Flues: Large gaps around masonry chimneys and metal flue pipes allow significant air leakage. High temperature sealants and metal flashing address these challenging locations.
Partition Walls: Interior walls extending to attics create cavities that act as chimneys, drawing conditioned air from living spaces into attics through gaps at top and bottom plates.
Professional Air Sealing Methods
Spray Foam: Two-part polyurethane foam expands to fill irregular gaps completely. Provides permanent seal resistant to air movement and moisture. Works for gaps from 1/4 inch to several inches. Required for sealing around chimneys, plumbing penetrations, and HVAC equipment.
Caulking: Latex or silicone caulk seals narrow gaps and cracks. Works for gaps less than 1/4 inch. Appropriate for electrical penetrations, small plumbing gaps, and joints between materials.
Weather-stripping: Adhesive-backed foam or rubber strips seal attic hatches and pull-down stairs. Creates compression seal when closed.
Rigid Foam Boards: Cut to size and foam-sealed in place, rigid boards cover large openings like whole-house fan openings or large plumbing chases.
Metal Flashing: High-temperature metal flashing sealed with fire-rated caulk addresses gaps around chimneys and furnace flues where materials must withstand heat.
Air Sealing Cost and ROI
Professional air sealing costs $500-1,500 for typical homes, depending on accessibility and number of penetrations. This investment delivers immediate comfort improvements and enhances insulation effectiveness by 15-30%.
Combined with insulation upgrades, comprehensive air sealing delivers payback periods of 3-5 years through energy savings while eliminating ice dams, reducing HVAC runtime, and improving comfort substantially.
Current Recommendations for Our Climate
Department of Energy Guidelines
The DOE recommends attic insulation levels based on climate zone and heating fuel:
Climate Zone 4 (southern portions of our region):
- Gas/Oil/Heat Pump Heating: R-38 to R-49
- Electric Resistance Heating: R-49 to R-60
Climate Zone 5 (northern portions of our region):
- Gas/Oil/Heat Pump Heating: R-49
- Electric Resistance Heating: R-49 to R-60
These recommendations assume unfinished, ventilated attics with insulation on the attic floor. Different strategies apply for cathedral ceilings or finished attic spaces.
Cost-Benefit Analysis by Existing Insulation Level
Current R-0 to R-11 (minimal or no insulation):
- Recommended upgrade: R-49 to R-60
- Cost: $1,800-3,500 typical home
- Annual savings: $400-800
- Payback: 2.5-5 years
- Priority: Highest – dramatic improvement
Current R-11 to R-19 (common in 1970s-1980s homes):
- Recommended upgrade: Add R-30 to reach R-49
- Cost: $1,200-2,500 typical home
- Annual savings: $250-500
- Payback: 3-6 years
- Priority: High – substantial improvement
Current R-19 to R-30 (homes with some upgrades):
- Recommended upgrade: Add R-19 to R-30 to reach R-49-R-60
- Cost: $800-1,500 typical home
- Annual savings: $150-300
- Payback: 4-7 years
- Priority: Medium – worthwhile improvement
Current R-30 or higher:
- Recommended: Verify condition, address air sealing
- Additional insulation shows diminishing returns
- Priority: Low unless insulation is damaged or compressed
Assessing Your Current Insulation
Determining existing insulation levels requires attic inspection. Measure insulation depth in several locations—settling and gaps mean depth varies. Multiply depth by R-value per inch for your insulation type to calculate current R-value.
Fiberglass batts typically have R-value printed on facing. Blown insulation requires measuring depth and knowing material type. Depth measuring rulers available at hardware stores simplify this process.
Professional energy audits include insulation assessment along with air leakage testing and HVAC evaluation. These comprehensive assessments cost $200-500 and identify all opportunities for efficiency improvements, not just insulation.
2026 Remodeling Cost Guide
Don’t get ripped off. See real pricing for bathrooms, kitchens, and HVAC.
Updated for 2026 Market Rates
Installation Methods and Best Practices
Blown Insulation Installation Process
Preparation: Remove or protect stored items. Cover attic access ladders and hatches to prevent insulation from falling into living spaces. Install baffles between roof rafters to maintain ventilation airflow from soffits.
Air Sealing: Seal all penetrations, gaps, and openings before installing insulation. This critical step prevents moisture problems and maximizes insulation effectiveness.
Depth Markers: Install markers showing target insulation depth. These guides ensure consistent coverage throughout the attic.
Blowing: Professional crews blow insulation through large hoses, distributing material evenly. Experienced installers know how much to apply accounting for settling. They work methodically to ensure consistent depth without gaps.
Verification: Final inspection confirms proper depth throughout attic and around obstacles. Verify ventilation pathways remain clear and insulation doesn’t block soffit vents.
Blown insulation installation typically takes 4-8 hours for average homes. Two-person crews work efficiently, with one operating the blower machine and one distributing insulation in the attic.
Spray Foam Installation Considerations
Spray foam installation requires specialized equipment, protective gear, and trained technicians. This isn’t DIY-friendly work—improper application creates health hazards and poor performance.
Open-Cell vs Closed-Cell Selection: Open-cell foam costs less and allows some vapor permeability. Closed-cell provides higher R-value per inch, acts as vapor barrier, and adds structural strength. For unconditioned attics in our climate, either works well when properly installed.
Ventilation Considerations: Spray foam applied to attic floors maintains traditional ventilation. Foam applied to roof decks (creating conditioned attics) eliminates need for roof venting but requires design considerations to prevent moisture problems.
Curing and Off-Gassing: Spray foam requires 24-48 hours to cure fully. During this period, strong odors occur. Occupants should vacate homes during application and until curing completes. Proper ventilation during curing is essential.
Cost-Benefit for Attic Floors: Spray foam’s higher cost ($1.50-3.50 per sq ft) compared to blown insulation ($0.50-1.00 per sq ft) means payback periods extend significantly. Most homeowners throughout our region choose blown cellulose or fiberglass for best value. Spray foam makes more sense for difficult-to-insulate areas or when creating conditioned attic spaces.
Ventilation Requirements
Balancing Insulation and Ventilation
Proper attic ventilation removes moisture and heat that would otherwise damage roofing materials and reduce insulation effectiveness. Building codes require specific ventilation rates, typically 1 square foot of net free ventilation area per 150 square feet of attic space.
Adequate insulation must not block ventilation pathways. Baffles installed between roof rafters maintain air channels from soffit vents to ridge vents even when deep insulation fills the attic floor.
Ventilation System Components
Soffit Vents: Allow cool outside air to enter attics at eaves. These intake vents must remain unobstructed by insulation.
Ridge Vents: Continuous vents along roof peaks allow hot air to exit. Combined with soffit vents, they create natural convection that ventilates attics effectively.
Gable Vents: Triangular vents in gable ends provide ventilation but work less effectively than soffit-to-ridge systems.
Power Attic Ventilators: Electric fans that exhaust hot air. These supplement passive ventilation but consume electricity and may create pressure imbalances drawing conditioned air from living spaces into attics.
Common Ventilation Problems
Many older homes throughout Steubenville, Athens, and Gallipolis have inadequate or blocked ventilation. Common issues include:
Blocked Soffit Vents: Insulation pushed against eaves blocks airflow. Baffles prevent this problem while maintaining insulation depth.
Insufficient Vent Area: Original construction often provided minimal ventilation. Adding insulation without verifying adequate ventilation creates moisture problems.
Mixed Ventilation Systems: Combining ridge vents with gable vents or power fans creates unpredictable airflow patterns. Consistent soffit-to-ridge ventilation works best.
Professional insulation contractors assess existing ventilation and recommend improvements when necessary. Proper ventilation prevents the moisture damage and premature roof deterioration that occurs in poorly ventilated, well-insulated attics.
Finding Qualified Insulation Contractors
Essential Contractor Qualifications
Experience and Training: Insulation installation requires understanding building science, moisture management, and material properties. Experienced contractors know how insulation, air sealing, and ventilation interact.
Proper Equipment: Professional insulation blowers, spray foam rigs, and safety equipment indicate serious contractors invested in quality work.
Insurance Coverage: Verify liability insurance and workers compensation. Attic work involves fall hazards and other risks. Proper insurance protects homeowners from liability.
References and Portfolio: Request references from recent projects similar to yours. Contact references and ask about quality, cleanliness, and whether promised energy savings materialized.
Energy Audit Capabilities: Contractors offering comprehensive energy audits with blower door testing and thermal imaging provide data proving insulation effectiveness and identifying air leakage.
Red Flags to Avoid
Extremely Low Bids: Insulation materials cost what they cost. Dramatically lower bids suggest inadequate depth, poor air sealing, or inexperienced installation.
No Air Sealing Mentioned: Any contractor who doesn’t discuss air sealing lacks understanding of proper insulation practice. Air sealing is mandatory for effective insulation.
Unwillingness to Install Baffles: Baffles maintain ventilation and prevent insulation from blocking soffit vents. Contractors who skip this step create moisture problems.
Rush Jobs: Proper insulation installation requires time for air sealing, baffle installation, and careful material application. Contractors promising completion in 2-3 hours for whole homes are cutting corners.
No Discussion of Existing Conditions: Every attic has unique characteristics—knob-and-tube wiring, vermiculite insulation, inadequate ventilation. Contractors must assess existing conditions and address problems before adding insulation.
Questions to Ask Potential Contractors
What air sealing will you perform before installing insulation? Look for detailed answers about sealing specific penetrations, not vague promises to “seal things up.”
Will you install baffles to maintain ventilation? Proper answer: Yes, between every rafter bay with soffit vents.
What insulation depth will you install, and what R-value does that achieve? Verify depth calculations match R-value targets accounting for settling.
How do you handle knob-and-tube wiring if present? Covering knob-and-tube wiring with insulation creates fire hazards. Proper answer involves electrician consultation for rewiring.
Do you provide post-installation energy audit or verification? Some contractors verify insulation depth and demonstrate air sealing effectiveness through blower door testing.
What warranties do you provide? Material warranties vary by product. Labor warranties should cover installation quality for at least one year.
Insulation Costs in Southern Ohio & Northern Kentucky
Blown Insulation Pricing
Blown Fiberglass:
- Material: $0.30-0.50 per square foot
- Installation: $0.20-0.50 per square foot
- Total: $0.50-1.00 per square foot installed
- 1,500 sq ft attic to R-49: $750-1,500
Blown Cellulose:
- Material: $0.35-0.55 per square foot
- Installation: $0.20-0.50 per square foot
- Total: $0.55-1.05 per square foot installed
- 1,500 sq ft attic to R-49: $825-1,575
Air Sealing Pricing
Basic Air Sealing (attic penetrations only): $300-600 Comprehensive Air Sealing (includes recessed lights, plumbing, electrical, HVAC penetrations): $500-1,200 Whole-House Air Sealing (includes basement rim joists, windows, exterior penetrations): $1,000-2,500
Total Project Costs
Typical Home (1,500 sq ft attic):
- Air sealing: $500-800
- Insulation to R-49: $750-1,575
- Baffles and ventilation work: $200-400
- Total: $1,450-2,775
Large Home (2,500 sq ft attic):
- Air sealing: $700-1,200
- Insulation to R-49: $1,250-2,625
- Baffles and ventilation work: $300-600
- Total: $2,250-4,425
Costs increase for:
- Difficult attic access requiring removal of obstacles
- Removal and disposal of existing damaged insulation
- Knob-and-tube wiring requiring relocation or rewiring
- Inadequate ventilation requiring additional soffit or ridge vents
- Two-story homes requiring multiple attic spaces
Return on Investment Timeline
Annual Energy Savings (upgrading from R-19 to R-49):
- Gas heating: $200-400 annually
- Electric resistance heating: $400-700 annually
- Heat pump: $250-500 annually
Payback Periods:
- Low-cost project ($1,450) with high savings ($500): 2.9 years
- Average project ($2,200) with moderate savings ($350): 6.3 years
- High-cost project ($3,500) with low savings ($250): 14 years
Most homeowners throughout Maysville, Paducah, Owensboro, and Henderson experience payback within 4-7 years while enjoying improved comfort immediately.
DIY vs Professional Installation
When DIY Makes Sense
Homeowners with accessible attics, basic construction knowledge, and appropriate safety equipment can install blown insulation themselves. Equipment rentals cost $50-100 daily. Material costs match what professionals pay.
However, DIY approaches often skip critical air sealing, install inadequate depths, miss areas around obstacles, and fail to maintain proper ventilation. These shortcuts compromise insulation effectiveness substantially.
Why Professional Installation Delivers Better Results
Comprehensive Air Sealing: Professionals identify and seal all air leakage paths, not just obvious ones.
Proper Depth Accounting for Settling: Experienced installers know exactly how much material to apply so settled insulation achieves target R-values.
Even Distribution: Professional equipment and technique ensure consistent coverage without gaps or thin spots.
Ventilation Protection: Baffles installed correctly maintain airflow while achieving full insulation depth.
Safety Equipment and Training: Professionals have proper respirators, protective clothing, fall protection, and experience working in confined attic spaces.
Efficiency: Professional crews complete in hours what takes DIYers full weekends, with better results.
For most homeowners, professional installation costs 50-100% more than DIY material costs but delivers substantially better performance and 10-20 year warranties backing the work.
Special Considerations for Our Region
Ice Dam Prevention
Ice dams form when heat escaping through inadequate insulation melts snow on roofs. Water runs down to cold eaves where it refreezes, creating dams that force water under shingles causing interior damage. Ice dams are common throughout our region during winters with significant snowfall.
Proper insulation and air sealing eliminate heat loss that causes ice dams. The investment in attic insulation often pays for itself through prevented ice dam damage alone—roof repairs and water damage remediation from single ice dam events cost $2,000-8,000.
Humidity Control
Southern Ohio and Northern Kentucky’s humid climate makes moisture management critical. Air sealing prevents warm, humid indoor air from reaching cold attic surfaces where moisture condenses. This condensation damages insulation, promotes mold growth, and rots framing.
Proper air sealing combined with adequate insulation and ventilation keeps attic spaces dry year-round, preventing the moisture problems that plague homes throughout communities near the Ohio River.
Historic Home Considerations
Older homes in Marietta, Steubenville, and Ashland often have knob-and-tube wiring that cannot be covered with insulation due to fire hazards. These homes require electrical upgrades before insulation installation—addressing both issues during comprehensive remodeling projects makes economic sense.
Historic homes may also have unique ventilation patterns and construction details requiring specialized approaches. Experienced contractors understand how to insulate historic homes without damaging character or creating moisture problems.
Making the Investment Decision
Attic insulation upgrades in Southern Ohio and Northern Kentucky deliver exceptional returns through reduced energy costs, improved comfort, and prevented damage from ice dams and moisture. For homeowners throughout our region planning comprehensive remodeling or seeking cost-effective improvements, attic insulation deserves top priority.
The combination of relatively low cost, immediate comfort improvements, substantial energy savings, and prevented damage makes attic insulation among the smartest investments you can make in your home.
At Kore Komfort Solutions, we help homeowners throughout Southern Ohio and Northern Kentucky understand insulation requirements and connect with qualified contractors who deliver professional results. Our expertise in building science and home performance positions us to guide you toward improvements that actually deliver promised savings.
Contact Kore Komfort Solutions to discuss your home’s insulation needs and discover how proper attic insulation creates lasting value in Ashland, Marietta, Steubenville, Athens, Gallipolis, Mt. Orab, Maysville, Paducah, Owensboro, Henderson, Portsmouth, Chillicothe, Waverly, and throughout our region.
Frequently Asked Questions
Q: How much attic insulation do I need in Southern Ohio or Northern Kentucky?
A: Current recommendations for our region call for R-49 to R-60 in attics depending on your heating system. Homes heated with natural gas, oil, or heat pumps should have minimum R-49 (approximately 15-17 inches of blown cellulose or fiberglass). Homes with electric resistance heating benefit from R-60 (approximately 18-20 inches of blown insulation). These recommendations come from the Department of Energy for Climate Zones 4 and 5, which cover Southern Ohio and Northern Kentucky. Most homes built before 1990 have only R-19 or less, meaning they need 10-15 inches of additional insulation to reach recommended levels. Measuring existing insulation depth and multiplying by R-value per inch (R-2.2 to R-3.8 depending on material type) tells you current R-value. Subtract from target R-value to determine how much additional insulation you need. Professional energy audits include insulation assessment along with air leakage testing, providing comprehensive understanding of your home’s efficiency opportunities.
Q: Should I add insulation myself or hire professionals?
A: While DIY attic insulation is possible, professional installation delivers substantially better results for several reasons. Professionals perform comprehensive air sealing before installing insulation—the critical step most DIYers skip that accounts for 30-50% of insulation effectiveness. Experienced installers know exactly how much material to apply accounting for settling, ensuring insulation achieves target R-values after it settles over months. Professional equipment distributes insulation evenly without gaps around obstacles that DIY efforts often miss. Contractors install baffles correctly to maintain ventilation while achieving full insulation depth—improper ventilation causes moisture damage costing thousands to repair. Professionals have proper safety equipment including respirators, protective clothing, and fall protection for working in confined attic spaces. Most importantly, professional installation includes warranties backing the work. The cost difference between DIY materials ($800-1,200) and professional installation ($1,450-2,775 for typical homes) represents 50-100% premium, but professional work delivers better performance, proper air sealing, maintained ventilation, and guaranteed results that DIY efforts rarely achieve.
Q: Will adding attic insulation really lower my energy bills?
A: Yes, substantially—if proper air sealing accompanies insulation and your home currently has inadequate insulation. The Department of Energy estimates attic insulation can reduce heating and cooling costs 10-50% depending on existing insulation levels. Homes throughout our region with minimal insulation (R-11 or less) upgrading to R-49 typically save $400-800 annually. Homes with moderate insulation (R-19) upgrading to R-49 save $250-500 annually. Actual savings depend on several factors: your heating and cooling costs before insulation, how you operate your HVAC system, your home’s air leakage rate, and other efficiency characteristics. Homes with significant air leakage need comprehensive air sealing to achieve full insulation benefits—adding insulation alone over major air leaks delivers disappointing results. Professional energy audits using blower door testing measure air leakage and predict energy savings accurately. These audits cost $200-500 but prevent investing in insulation when other issues would deliver better returns. For most homes with inadequate insulation, proper attic insulation plus air sealing pays for itself within 3-7 years through energy savings while immediately improving comfort.
Q: What’s the difference between fiberglass and cellulose insulation?
A: Both materials work well for attic insulation in our climate when properly installed, but they have different characteristics. Fiberglass blown insulation costs slightly less ($0.50-1.00 per sq ft installed), provides R-2.2 to R-2.9 per inch, settles minimally (2-3%), resists moisture absorption, and doesn’t support pest activity. Cellulose blown insulation costs slightly more ($0.55-1.05 per sq ft), provides higher R-value per inch (R-3.2 to R-3.8), settles more significantly (15-20% over time requiring initial over-application), is denser providing better air blockage, and is made from recycled paper treated with fire retardants and insect deterrents. For Southern Ohio and Northern Kentucky’s humid climate, both perform well. Cellulose’s higher density resists air movement better—important because air infiltration reduces insulation effectiveness substantially. Cellulose requires less depth for equivalent R-value, beneficial in attics with limited space. Fiberglass settles less, maintaining installed depth better over decades. Most professional contractors throughout our region prefer cellulose for its density and R-value advantages. Total installed cost differences are minimal, so performance characteristics matter more than price. Either material delivers excellent results when professionally installed with comprehensive air sealing.
Q: Can I install insulation if I have knob-and-tube wiring in my attic?
A: No—covering knob-and-tube wiring with insulation creates fire hazards and violates electrical codes throughout Ohio and Kentucky. Knob-and-tube wiring relies on air circulation for cooling. Surrounding it with insulation causes wiring to overheat, degrading insulation on conductors and potentially causing fires. Before installing attic insulation, homes with knob-and-tube wiring need electrical upgrades replacing old wiring with modern Romex cable. This requirement affects many homes throughout our region built 1900-1940s. Electrical rewiring costs $3,000-8,000 depending on home size and complexity, but this work is necessary regardless of insulation plans—knob-and-tube wiring represents fire hazards even without insulation. Addressing both electrical and insulation needs during comprehensive remodeling projects makes economic sense, avoiding separate contractor mobilizations and disruption. Some homeowners choose to insulate around knob-and-tube wiring, maintaining 3-inch clearances, but this approach leaves substantial attic areas uninsulated, dramatically reducing energy savings. For homes requiring electrical work anyway, complete rewiring followed by comprehensive insulation delivers best long-term value and safety. Licensed electricians and insulation contractors coordinate on these projects routinely throughout Southern Ohio and Northern Kentucky.
Related Articles:
- The Right Order for Home Remodeling Projects – Why insulation happens after mechanical systems but before finishes
- Your Complete 2026 Home Remodeling Guide – Comprehensive home improvements including energy efficiency upgrades
- Mini Split Heat Pump Systems – How proper insulation allows smaller, more efficient HVAC systems
Service Areas: Ashland KY, Marietta OH, Steubenville OH, Athens OH, Gallipolis OH, Mt. Orab OH, Maysville KY, Paducah KY, Owensboro KY, Henderson KY, Portsmouth OH, Chillicothe OH, Waverly OH, and surrounding communities throughout Southern Ohio and Northern Kentucky.

Author: Mike Warner
Mike Warner — Founder, Kore Komfort Solutions LLC U.S. Army veteran. 30 years in the trades — HVAC installation, kitchen and bathroom remodeling, and residential construction across Alaska, Washington, Colorado, Ohio, Kentucky, and Tennessee. I've pulled permits, managed crews, run service calls at midnight, and built a business from a single truck. Now I build the digital infrastructure that helps contractors compete and win. Kore Komfort Solutions exists for one reason: to give small and mid-size contractors ($2M–$10M) the same AI-powered tools, websites, and business systems that the big operations use — without the enterprise price tag or the learning curve. Through Kore Komfort Digital, we design and manage high-performance WordPress websites engineered to rank on Google and convert local searches into booked jobs. Through Rose — our AI-powered business management system currently in development — we're building the future of how contractors handle leads, scheduling, estimates, and customer communication. I write about what I know: the trades, the technology reshaping them, and how to build a contracting business that runs on systems instead of chaos. Every recommendation on this site comes from someone who's actually done the work — not a marketer who Googled it.